Friday, July 31, 2009

Studio on my back

This past weekend, I was asked by my friend John to come by his apartment to work on some photos of him and his roommate, Suzanne. They live in an older apartment building on the outskirts of Williamsburg and Bushwick, and Suzanne has decorated their place with all sorts of neat-looking vintage furniture and nick-nacks.

The two of them - John, being a rather fashionable fellow and former stylist, and Suzanne, being an actress - had a surprisingly wide variety of cool vintage clothing that they wanted to get dressed up in. We figured it might be fun to go for that classic "old time photo" look.

Mind you, we hadn't discussed this beforehand - all I knew going in was that we would be shooting in the apartment, and there might be a cat.

So I decided to try to over-prepare myself, and set to put together a rig that would allow me the option to use up to five lights, with an array of modifiers to go with them.


I looked at the directions to get to their place from my place, and unfortunately, there was no direct route. The nearest train stop is a good 15 minute walk, and there isn't a bus that goes near there, either. I didn't want to deal with calling a car or trying to find a taxi, because dammit - I've got a bike.


Normally, I'd pack two bags - my Pelican 1514 hard case, which would carry all of my camera gear and the strobes, and then my trusty Kelty backpack, which would get stuffed with all of the grip equipment. I've travelled this way many times in the past, and when I'm only walking a few blocks here and there (to and from the train), it's no problem.

This time, however, I figured I'd test my limits a bit.

As I was unpacking my gear from the Pelican case, I was struck with an idea - "I wonder if this padded divider insert would fit inside my backpack..." Sure enough, it fit inside perfectly. With room to spare, in fact. With the dividers in my pack, I was able to load up just about everything I'd normally put into the Pelican case. Since there was still room on top, and I needed some tension to ensure that everything held in place, I started placing my various modifiers and grip gear on top of and around the insert, until the bag was nice and tight. It zipped up without a problem.

Finally, I grabbed a pair of flimsy - er light-weight - light stand bags, and managed to stuff the remaining gear into them, and then secured them to the sides of the backpack. I picked up the pack (which must've weighed a good 40+ pounds), and it felt well-balanced. Sure enough, once it was on my back, it felt great. Looking in the mirror, I kinda felt like a little kid who was pretending to be Boba Fett or something (I know, I know, he didn't have two things pointing out of the sides; he had the one thing pointing out the middle. I said "little kid", okay? sheesh.)

With the pack secured, I hopped on my bike, and proceeded to shoot the following pictures:

SuzanneCouch


RAF2


and, going for the weathered/aged/vintage look:

J&SVintage3


I was so impressed with my pack-job, that I decided to make a little video of myself unpacking it all:

studio on my back pack job vid


Further details and a close-up shot can be found here.

Thursday, July 30, 2009

Manhattanhenge

I apologize for blogging about this so late, but hey - I've been keeping busy, and busy is good, right?

Right.

So a few weeks ago, an event called "Manhattanhenge" took place in New York City. This event happens twice a year in the summertime, where the setting sun hits the horizon in near-perfect alignment with the city grid of Manhattan. Stand on just about any east/west street, and you'll see the sun line right up in between the buildings and skyscrapers. It's pretty neat.

You can find a lot more info about it here.

Having done a little bit of research, I discovered a few things. There is a pretty decent following of this event, and lots of people like to come out and photograph it. Many of the posted photos I found listed where in the city they were shot from, so I made some mental notes about potential shoot-sites for myself. I had also noticed that no one seemed to post a decent-looking timelapse of the event. I'm sure it's been done, but I couldn't find any. So I decided to take a crack at it for myself.

I headed over to what seemed like the easiest, most convenient spot - the bridge that crosses over 42nd street, just above 1st ave.

Unfortunately, I wasn't the only one with this idea. By the time I had arrived (about 7:45 or so), there was already a large crowd of people huddled up against the railing of the bridge, taking up the whole sidewalk. A forest of tripods made it clear that there was no way I was going to be able to get my shot from this spot.

After glancing down 42nd street, I could make out what looked to be another bridge, about 3 or 4 avenues over. I hopped on my bike and headed in that direction to investigate.

Sure enough, there was an overpass, right in front of Grand Central Station. This looked like a perfect spot. Nobody was up there, so I maneuvered around until I could find my way up. That's when I figured out why no one was up there - there were signs at at the on-ramp onto the bridge stating "no pedestrian traffic".

I reasoned that since I was on my bike, I really couldn't be classified as a pedestrian. So I pedaled up to the spot, where I found a very narrow sidewalk. I stashed my bike, and set up my two Canons - the SD630, shooting as fast as it could (about 1 frame every 2-3 seconds), and the G7, shooting a -2, 0, +2 bracket sequence as fast as it could (also about 2-3 seconds) - using the wonderful CHDK intervalometer I've become so dependent on.

I used a super clamp and a little ball head to secure the cameras to the railing, and - fearing interference from the police - I decided to step away from the railing and wait until the last moment before the sunset (which only lasts about 3 or 4 minutes) to grab some stills with my other cameras.

Everything was going smoothly, but sure enough, as the sunset crept closer, people started to walk up to my spot, and set up their tripods and get ready for their shots. After about three of four of them showed up, I decided that I'd better get over there, so as to secure my own spot, and to make sure nothing happened to my TL cams.

By the time the event had finally come around, I'd say there were a good dozen or so fellow law-breakers up there with me, and we were all shooting away. I snapped a few frames with the F3 on Velvia, and wound up setting up another super clamp with a magic arm to help me stabilize my D90 with the 80-200, which I was shooting bracketed frames with as well.

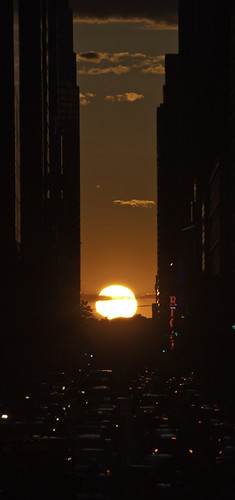
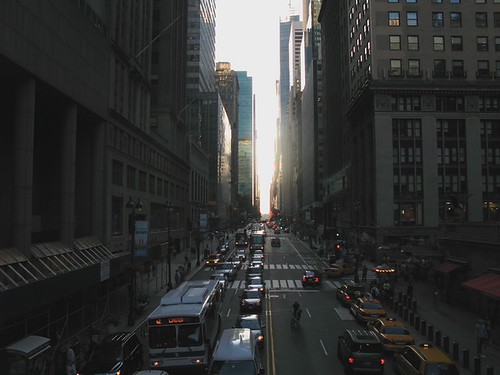
Here's a quick iPhone grab of what my view was:
IMG_0098


The best-looking shot I was able to get with the D90 looks like this:

Manhattanhenge


Not bad, but not great, either. Shooting the sun is harder than I expected.

As the last of the sun disappeared into the horizon, as if on cue, one of New York City's finest came along to break up our little party. He asked if any of us were interested in receiving a summons, and if not, to vacate the bridge immediately. Since I had so much crap with me, I did the best I could to pack up quickly, but I did stall a little, with the hopes of at least letting the TL cams catch that last bit of sun disappearing as possible.

I was the last person to leave the bridge (first one in, last one out, heh), and fortunately, the cop didn't give me any trouble.

When I got home to compile the TL frames, I realized that my framing was a bit on the wide side, and a tighter composition (not unlike the still above) would've probably made for a better shot. I also forgot to set the cameras to under-expose, so the frames that the 630 shot were pretty much useless. I monkeyed around with some HDR and exposure blending with the frames from the G7, but due to the rapid movements of the street traffic, nothing looked right.

In the end, I decided I'd just compile the -2 set of frames, and go with that; lesson learned.

Here it is up on flickr:

Manhattanhenge TL


I know, too wide. And the sky is completely blown out.

Anyway, there is a happy ending to this story.

For whatever reason, I decided to post my shots as soon as I'd finished them (this is not something I do very often; I tend to post bunches of stuff all at once).

I woke up the next morning to find a ton of messages in my flickr inbox, reporting new comments on my movie, and, more surprisingly, lots of new contacts (followers). It turns out that the flickr blog decided to post about Manhattanhenge that day, and they linked to my time lapse movie (probably because it was the only one) in their post.

I scored a all-time personal best hit count that week, landing well over 500 views over the next couple of days. Pretty cool, but I really wish the shot had come out better.

Oh well. Lessons learned for next time.

Wednesday, July 29, 2009

More work!

Shortly after the workshop, I wound up getting two gigs back-to-back.

One of them was a corporate portrait for use on the company's website, and the other was a custom "stock" piece.

The first job was obtained through my long-time friend, the extremely talented Josh Berta. He's been working with Rocco Piscatello at the Piscatello Design Centre for some time now, and when one of their client's website needed an updated photo, he referred me for the job.

I met with Rocco, and we discussed what he was looking for, and later that week, we got together at the client's office for the shoot.

Here's what we went with:
Desk


Shot with my lovely new 35mm lens, and converted to black-and-white in Photoshop.

The very next day, I got a call from another graphic designer, Ben King (who, coincidentally, I met through Josh), and he asked me if I would be able to put together a shot for him within the next 24 hours. He described what he was looking for - a hand holding a remote control, giving the impression of "power", for use in an comp he was working on for a client. I think it had something to do with "on demand". The final direction was "think 'Black Panthers' but with a remote in the fist".

Fortunately, my friend Ryan had a nice-looking remote control, and he was available to model for me first thing the next morning. We wound up going with this shot:

Remote


I did a few little bits of touch-up in Photoshop, but I think it came together nicely, and Ben was appreciative of the fast turn-around.

I have to say - I was really into this kind of work. Getting a specific assignment, and setting out to do it is a very rewarding process for me. I think it appeals to the "problem solver" in me, which has a tendency to come through in a lot of the stuff I do.

This shoot gave me an idea for a potentially cool concept, which I'll be writing about in a future post.

Tuesday, July 28, 2009

Kent Miller

As I mentioned in an earlier post, I was fortunate enough to meet Kent Miller at the workshop I attended last month.
He and I exchanged contact info, and after a couple of weeks of email tag, we finally got together to meet up and talk shop.

Long story short, I asked Kent if I could assist him, and he agreed.

So far, this is looking like it's been just the break I've been hunting for. In the short time that we've been working together, we've shot jewelry, window displays at Macy's, a fashion model in the woods, live music, and some headshot/portrait work in the studio.

As images from these shoots are edited and finished, I'll post links to them on Flickr.

In the meantime, I've got a lot of other stuff to catch up on.

Tuesday, July 14, 2009

35mm/1.8 = sweetness.

A couple of months ago, Nikon released a new lens: the 35mm f1.8 G. Its street price is $199, which is pretty reasonable.

I'd say that this lens fills a much-needed gap in Nikon's line. Here's what I mean...
If you want to skip my history lesson and just read about the lens, click here.
Back in the days of film cameras, it was not uncommon to see a 50mm lens bundled with a new camera body. The 50mm was considered a great "starter" lens, what with its near 1:1 (or "normal") field of view. The lens became so ubiquitous that nearly everyone who had an SLR had one kicking around somewhere. They were usually f1.8, but you'd also see f1.4 and even f1.2 (from Canon, anyway) models, too. Suffice to say, it became a standard.

When the first DSLRs started to appear (almost 10 years ago), they all featured imaging sensors that were a bit smaller than a standard 35mm piece of film. With a smaller sensor, less of the image coming through the lens would be captured by the camera - only the information in the center; the edges would be cropped out. This crop factor effectively raised the functional focal length of a standard 35mm SLR lens by a factor of 1.5 or so. In other words, if you stuck your trusty 50mm lens on your new DSLR camera, you wouldn't be seeing that same 1:1 normal view that you were used to - you'd be seeing more along the lines of what an 85mm lens would get you (well, somewhere between 65 and 85, anyway). So if you wanted to get that 1:1 look, you'd need to step down to a wider lens, like a 35mm.


What with the advent of point-and-shoot cameras and inexpensive video cameras getting more and more accessible and easy to use, the general photographing public had come to expect the ability to "zoom", right out of the box. As DSLR technology evolved, manufacturing processes got more efficient and inexpensive, and camera manufactures began producing entry-level cameras that came bundled with zoom lenses. Gone were the days of the 50mm being the standard "first lens".

You could still pick up a 50mm lens for under $200 - sometimes as little as $100 - but they weren't being packaged with new camera bodies anymore.


Nikon has been making lenses for their SLR cameras since the 60s. And thanks to their fierce commitment to their lens mount system, you can stick just about any lens on just about any camera (within reason), and shoot a picture. Obviously, the super-old stuff doesn't really work that well with the super-new stuff (and vise-versa), but there's some nice overlap in the middle, giving the Nikon user a really nice range of choices.

So let's talk about the 35mm lens for a minute. On a 35mm film camera (this can get a bit confusing, I know) a 35mm lens is considered a wide angle lens. Not super-wide, mind you, but wide enough for you to get a little bit closer to your subject, or to get a little more of your surroundings in for landscape work. My dad's 35mm lens was an old manual focus f2.8. Not particularly fast, but a solid performer.

Nikon made some faster versions of the 35mm, eventually getting it all the way down to 1.4 (selling for upwards of $500).


Now let's talk about the whole DX/FX thing.

FX and DX are Nikon-speak for their two types of DSLR cameras. Long story short - FX cameras have bigger sensors in them, which in turn allow lenses to behave the way they do on 35mm film cameras. No more crop factor! DX cameras have the smaller sensors, and behave the way I described above.

Recently, Nikon has been producing more and more DX-based cameras than in the past. For example, last year's lineup had two FX-based cameras, and three DX-based models. Right now, you can still find all of last year's cameras, plus two more DX-based cameras as well. I guess we can count the D3x as an additional FX-based camera, too. But my point in bringing this up is that it seems that despite the fact that Nikon has finally broached the "full frame" barrier, they are still very much committed to making DX-based cameras, as well.


Which brings us to my new lens!


Prior to this lens, I've had the 50mm 1.8 (AF, first-gen) and an older 50mm 1.4 (AI'd manual), from years ago. The 1.8 is an okay lens, but it has a really frustrating drawback, of creating these really noticeable and annoying ghost-like flares when shooting bright subjects in the dark , wide open (and gee, who'd be shooting wide open in the dark? hmm). So I stopped using it, and gave the manual focus thing a try, but man - at 1.4, focusing is a bit challenging. No biggie if you're working in still life, but if you're trying to shoot moving objects (like musicians on stage), then it's a real challenge. So I was definitely feeling a need for something to serve in that "normal" focal range, and having it be fast would also be nice.


Enter the 35/1.8 G. (G basically means that it doesn't have an aperture ring, so it's useless on older cameras. It also means it's got an internal motor, so the lower-end/entry-level cameras (like the D40/60) which don't have internal AF motors can auto focus as well).
At $200, it seemed too good to be true. I kinda expected it to suffer from the same kind of flaring issues I'd seen on my (and others', too) 50/1.8. But the reviews started to pour in, and everyone seemed to love it. Sample images looked great.
So I did some shopping around, and found that this thing is so popular, it's literally unavailable everywhere. I could buy it on eBay, but the average price is closer to $300. I wasn't in that big of a rush, so I decided to get on a waiting list. Three of them, in fact. Two mail-order, and one in-town, just to cover my bases. After almost four weeks, Amazon finally came through with the goods, and I am now a happy owner of this new little rockstar.

I've only used it a handful of times so far, but between its lovely "normal" focal range, its fast aperture, and - bonus - its light weight - it is fast becoming my favorite lens.

These days, my bag contains the 35/1.8, my [dad's] old first-gen AF 80-200/2.8, and my Tamron 14/2.8. If I'm feeling feisty, I'll bring along either the 65/2.8 macro or the Tamron 24-70/2.8. But I think my next lens purchase is probably going to be a Nikon wide zoom. We'll see.

Monday, July 13, 2009

Workshop with Joe.

A few weeks ago, I attended a "One-Day Lighting" workshop presented by Joe McNally. He's become somewhat of a rockstar lately, following the success of his latest book, The Hotshoe Diaries (which I own), and through some consistent, quality social networking (he has recently gotten into twitter, and just updated his blog). There's tons of info about him out there, so I'll skip the history lesson and move onto the details of the class.

Long story short - it was pretty much exactly what I'd expected.

Having been hip to Joe's style and approach for the past year or so, I've done a fair amount of research and ingesting - watching any/every video of his I could get my hands on, reading his blog and book(s), etc. The class was basically like a live-action version of what I'd been reading and watching. No real new or ground-breaking info, but it was definitely inspiring and exciting to actually meet Joe and see him do his thing in person.


The workshop also wound up being an excuse for my old pal Seth to come out for a visit (we attended the class together), and we got some good hang-time in. The first night he arrived - literally right from the airport - we ended up at a Coney Island freak show, where I was fortunate enough to snap a quick shot of this guy:
PooBah


And in the spirit of making the most of our time together, we organized a photo shoot with my friend Michelle and her friend Coco. Coco is a burlesque performer, who happens to be a fire-eater (among other things). Michelle was interested in learning how to eat fire, so I shot some pictures of the two of them in Coco's backyard:
CoCo Fire


Michelle Fire


Pretty cool. Or, "hot", I guess. (sorry)

Anyway, it turned out to be a pretty good week.

Oh, I almost forgot - what wound up being the most valuable take-away from the workshop was a networking connection that I made. For this series of classes (there were two week's worth), Joe called upon many of his friends and colleagues to help him out - both in front of the camera and behind the scenes. One of the folks he had up to help out with modeling for our class was a guy named Kent.

During some down time, I struck up a conversation with him, learned that not only was he a professional photographer himself, but he also worked as an assistant to Joe in the past. After hearing this, I asked him for some advice (the basic "do you have any suggestions/tips for an up-and-coming pro?" thing). We didn't have a ton of time to chat, but we did exchange contact info.

I'll talk more about Kent in an upcoming post. Stay tuned.

Busy busy.

Man, I can't believe it's been over a month since my last post!
Damn!

Okay, so here's what I've been up to (photographically) lately:

I attended a workshop taught by Joe McNally.

I landed two, completely unrelated paid gigs (one "corporate", the other "stock")

I met a really cool professional photographer who I should be able to work with (assist) in the future.

I got a spiffy new lens.

I've been thinking up a few new ideas for projects/techniques.


I think each one of those things warrants its own post, and, given that it's practically 5am, I'm going to bed.

But stay tuned!

Drafts have been started!

I WILL be a good blogger, dammit.

that is all.