Picked up a couple of these guys today from B&H.
In short - get one for any of your metal-shoed/pin-locking Nikon speedlites. You won't regret it. For more info, read on.
My main lighting setup consists of four Nikon speedlites: two SB-26s and two SB-80DXes.
The reasons I use these lights are:
They were inexpensive - well under $150 (and as low as $100) each on ebay.
They have PC ports on them for use with PocketWizards (or other triggers).
They have built-in optical slave triggers as well, just in case.
Ideally, I'd have a set of four SB-800s, but at over $300 a pop, that's just out of my price range.
I also have an SB-600, the 800's poorer little brother, which does not have a sync port or an optical slave, but _does_ have the ability to speak Nikon's CLS ("Creative Lighting System") language, which can be really useful in certain situations.
Anyway, the majority of the time, I use these lights attached to light stands or other off-camera mounting contraptions. The primary method of mounting a light onto a stand is usually via a bracket, not unlike this one.
I've got a few of these, and some of them came with the exact kind of flash shoe shown in that picture - a little hunk of metal. For my older lights (the SB-26s, and anything older than them as well) which have the all-plastic shoe style, with the screw-down type locking ring, they're fine.
But for the newer, modern speedlites (like the SB-80DX and SB-600), which use the metal shoe with the locking pin mechanism, the metal shoe mounts do not offer a secure platform. In fact, my SB-600 took a nasty spill after slipping out of one of these guys, and is currently at Nikon being repaired.
So I did some research, and found these guys. They are made of a very sturdy plastic - so they won't mess with the other pins on the bottom of the hotshoe. This is significant for a few reasons, including the potential for shorting out the flash, and (at least in the case of my SB-80s) causing the flash to think that it's attached to a camera hotshoe, and overriding the flash's standby and power settings - super-annoying.
So I got a pair of these, one for each of the SB-80s, and they work perfectly.
I think I'm just going to leave the cold shoes attached to the flashes by default, as I always seem to be taking them off and putting them back on again.
Tuesday, April 21, 2009
Thursday, April 16, 2009
Timelapse with the G7
Since I've decided to use point-and-shoot class cameras for my time lapse work, I decided that - as much as I love it - my little Canon SD630 wasn't really giving me the kind of quality and performance that I'd like.
One of the things using that camera did open me up to was the Canon Hackers Development Kit (aka CHDK) - an "upgrade" to the existing camera firmware that offers several cool handy features, including (in my case) an extremely versatile intervalometer.
After doing a bit of research, I decided that Canon's top-end PowerShot series - the "G" series - was where I should be looking for my next TL camera. The current offerings, the G10 and the G9, are both really fantastic little cameras, packed with some great features like full manual control, a hotshoe for off-camera flash, a nice big lens, and extremely solid build quality.
I decided that since I'm going to be shooting frames for video, extremely high-resolution images aren't really that big of a deal to me. So I aimed a bit lower, and found that the PowerShot G7, at 10 megapixels, would probably suit my needs.
Price watching on ebay showed me that the going price for a G7 is about $250 - close to half the cost of the currently available G10. The final determining factor, however, was the fact that there has been a version of the CHDK in development for the G7 for a year or two. I know they're working on versions for the G9 and G10 right now, and I'm sure they'll be available soon enough.
So I received my ebay-bought G7 yesterday, which came with an additional (third party) battery, and jumped right in. Another feature I was pleased to discover was the fact that this camera didn't seem to have any issues with SD cards larger than 2GB (the 630 didn't recognize the larger cards for some reason).
After some trial and error, I got the CHDK installed and working on a 4GB card, and ran upstairs to my roof to run some tests.
My first trial was using the "continuous mode" trick, clamping the shutter button down and letting it run perpetually. To my surprise, I was able to capture around 3500 frames at around over a period of about 25 minutes or so - at which point, the SD card had filled up! I was also delighted to find that the battery appeared to have been only 50% depleted. My hunch is that being able to turn off the rear LCD while shooting has a major impact on battery life.
Next, I decided to try capturing a sunset using the CHDK intervalometer. [one of the downsides to the continuous mode technique is that the focus and exposure settings are locked into place for the entire run. This is fine if you're working with consistent, continuous light (like in the middle of the day), but if you're trying to capture a dynamic transition in light (say, a sunrise or a sunset), then it's no good.]
After a little experimenting, I figured out how to get the CHDK routine working with the LCD powered off, and let it run.
I let it go for well over an hour, and was shocked to find that the camera was still shooting - mainly because I hadn't had the chance to recharge the battery from the prior test, and it started this run at around 50% capacity. It captured another 1200 frames or so before I stopped it. At that point, the battery was practically at 0%, but still - I am extremely pleased with the battery performance at this point.
Here is the shot I made of the sunset:
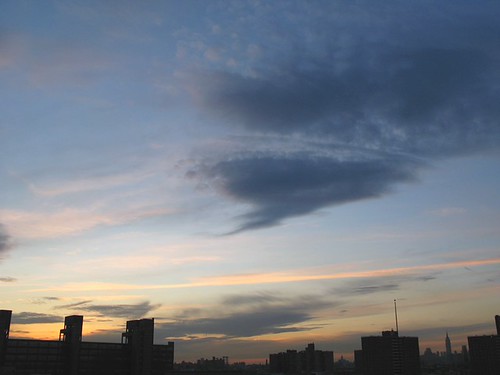
A couple of issues, yes, but for a first run, I'm pretty happy.
As I type this, the camera is shooting the sunrise. Stay tuned on my flickr feed for the results (assuming they're presentable).
One of the things using that camera did open me up to was the Canon Hackers Development Kit (aka CHDK) - an "upgrade" to the existing camera firmware that offers several cool handy features, including (in my case) an extremely versatile intervalometer.
After doing a bit of research, I decided that Canon's top-end PowerShot series - the "G" series - was where I should be looking for my next TL camera. The current offerings, the G10 and the G9, are both really fantastic little cameras, packed with some great features like full manual control, a hotshoe for off-camera flash, a nice big lens, and extremely solid build quality.
I decided that since I'm going to be shooting frames for video, extremely high-resolution images aren't really that big of a deal to me. So I aimed a bit lower, and found that the PowerShot G7, at 10 megapixels, would probably suit my needs.
Price watching on ebay showed me that the going price for a G7 is about $250 - close to half the cost of the currently available G10. The final determining factor, however, was the fact that there has been a version of the CHDK in development for the G7 for a year or two. I know they're working on versions for the G9 and G10 right now, and I'm sure they'll be available soon enough.
So I received my ebay-bought G7 yesterday, which came with an additional (third party) battery, and jumped right in. Another feature I was pleased to discover was the fact that this camera didn't seem to have any issues with SD cards larger than 2GB (the 630 didn't recognize the larger cards for some reason).
After some trial and error, I got the CHDK installed and working on a 4GB card, and ran upstairs to my roof to run some tests.
My first trial was using the "continuous mode" trick, clamping the shutter button down and letting it run perpetually. To my surprise, I was able to capture around 3500 frames at around over a period of about 25 minutes or so - at which point, the SD card had filled up! I was also delighted to find that the battery appeared to have been only 50% depleted. My hunch is that being able to turn off the rear LCD while shooting has a major impact on battery life.
Next, I decided to try capturing a sunset using the CHDK intervalometer. [one of the downsides to the continuous mode technique is that the focus and exposure settings are locked into place for the entire run. This is fine if you're working with consistent, continuous light (like in the middle of the day), but if you're trying to capture a dynamic transition in light (say, a sunrise or a sunset), then it's no good.]
After a little experimenting, I figured out how to get the CHDK routine working with the LCD powered off, and let it run.
I let it go for well over an hour, and was shocked to find that the camera was still shooting - mainly because I hadn't had the chance to recharge the battery from the prior test, and it started this run at around 50% capacity. It captured another 1200 frames or so before I stopped it. At that point, the battery was practically at 0%, but still - I am extremely pleased with the battery performance at this point.
Here is the shot I made of the sunset:
A couple of issues, yes, but for a first run, I'm pretty happy.
As I type this, the camera is shooting the sunrise. Stay tuned on my flickr feed for the results (assuming they're presentable).
Thursday, April 9, 2009
eye in the sky
Years ago, when I was using my CoolPix 5000 to photograph bands performing, I came up with a neat idea - stick the camera at the end of a pole (in this case, it was a monopod), and get above everyone's heads - maybe even on the eye-level of the folks on stage (depending on the venue, of course).
The first iteration of this technique relied on the articulated viewfinder of the CoolPix, which I would angle facing downward so I could at least get a vague sense of the composition I'd be getting (I say vague cuz that screen is the size of a large postage stamp, and seeing it from 5+ feet away isn't exactly useful). I'd also need to use the camera's self-timer to trip the shutter.
I used to think of this technique as a kind of "fishing"; you angle the viewfinder, set the timer, and then hoist the camera up into the air, hoping you get a decent shot in the time it takes for the camera to make the exposure. Once you see the LCD flicker, you hoist the camera back down again to see what you caught. Repeat.
I don't think I got any award-winning shots from that technique, but it definitely proved itself fun, at the very least, and somewhat useful.
Some time after that, I added two more elements to this technique - a remote control (you could call it a cable release, of sorts; Nikon called it the "Remote Cord"), and one of those little hand-held television/watchman gizmos. When all of these things were put together, I'd have the ability to leave the camera up in the air, and be able to compose and review my shots on the remote screen, tripping the shutter with the remote cable. Pretty cool.
Recently, I purchased a 5 foot boom pole so that I can hang lights directly over things that I'm photographing. Just this morning, it occurred to me that I could replicate my old CoolPix "camera on a stick" rig with my D90.
Here's how I did it:
First, I used a standard umbrella bracket to mount the camera to the end of the boom. I might consider using something lower-profile, like a ball head or some other sort of clamp, but for now, this works just fine.
Next, I pulled out the successor to the little Casio handheld tv I mentioned earlier; this little Coby handheld tv. Unfortunately, you get what you pay for with these things, and the image quality is quite awful. It also seems to have some issue with the proportions of the image, and stretches the D90's 4:3 image to fit the 16:9 screen. But it still works.
Using a super clamp and a spring clamp, I fastened the tv to the bottom of the boom pole. I then ran the 1/8" to 1/8" cable (which came from an old set of computer speakers) from the tv's input to the D90's NTSC output jack.
Lastly, I connected the poor man's alternative to Nikon's cable release for the D90 - this guy - which I got a few weeks ago for another project (which I'll write about later).
The key to really rocking this system is the D90's LiveView mode. When the camera is in LV mode, the image on the built-in LCD is sent through to the video out(s), as well. So I can now compose and review my shots without having to use the "fishing" technique.
The only downside I see to this system is the relatively slow and weak autofocusing system that is used in LV mode. I would imagine that if I were to make serious use out of this rig, I'd probably work at a relatively high aperture, and set the focus manually.
Here are some crappy shots I took of the rig as described above, only using a monopod instead of the boom pole:


Next time I'm out shooting an event, I'll definitely be giving this a try.
The first iteration of this technique relied on the articulated viewfinder of the CoolPix, which I would angle facing downward so I could at least get a vague sense of the composition I'd be getting (I say vague cuz that screen is the size of a large postage stamp, and seeing it from 5+ feet away isn't exactly useful). I'd also need to use the camera's self-timer to trip the shutter.
I used to think of this technique as a kind of "fishing"; you angle the viewfinder, set the timer, and then hoist the camera up into the air, hoping you get a decent shot in the time it takes for the camera to make the exposure. Once you see the LCD flicker, you hoist the camera back down again to see what you caught. Repeat.
I don't think I got any award-winning shots from that technique, but it definitely proved itself fun, at the very least, and somewhat useful.
Some time after that, I added two more elements to this technique - a remote control (you could call it a cable release, of sorts; Nikon called it the "Remote Cord"), and one of those little hand-held television/watchman gizmos. When all of these things were put together, I'd have the ability to leave the camera up in the air, and be able to compose and review my shots on the remote screen, tripping the shutter with the remote cable. Pretty cool.
Recently, I purchased a 5 foot boom pole so that I can hang lights directly over things that I'm photographing. Just this morning, it occurred to me that I could replicate my old CoolPix "camera on a stick" rig with my D90.
Here's how I did it:
First, I used a standard umbrella bracket to mount the camera to the end of the boom. I might consider using something lower-profile, like a ball head or some other sort of clamp, but for now, this works just fine.
Next, I pulled out the successor to the little Casio handheld tv I mentioned earlier; this little Coby handheld tv. Unfortunately, you get what you pay for with these things, and the image quality is quite awful. It also seems to have some issue with the proportions of the image, and stretches the D90's 4:3 image to fit the 16:9 screen. But it still works.
Using a super clamp and a spring clamp, I fastened the tv to the bottom of the boom pole. I then ran the 1/8" to 1/8" cable (which came from an old set of computer speakers) from the tv's input to the D90's NTSC output jack.
Lastly, I connected the poor man's alternative to Nikon's cable release for the D90 - this guy - which I got a few weeks ago for another project (which I'll write about later).
The key to really rocking this system is the D90's LiveView mode. When the camera is in LV mode, the image on the built-in LCD is sent through to the video out(s), as well. So I can now compose and review my shots without having to use the "fishing" technique.
The only downside I see to this system is the relatively slow and weak autofocusing system that is used in LV mode. I would imagine that if I were to make serious use out of this rig, I'd probably work at a relatively high aperture, and set the focus manually.
Here are some crappy shots I took of the rig as described above, only using a monopod instead of the boom pole:
Next time I'm out shooting an event, I'll definitely be giving this a try.
moving forward
I've been catching up with a few old friends lately, and telling them "how I'm doing". I don't know about you, but when I find myself telling the same basic story over and over again, I start to feel like I might as well write it down. So here it is.
After breaking the news that I've decided to move away from doing the Mac thing full time and that I've decided to take a crack at doing the Photo thing instead, the next follow-up question is usually "so what kind of stuff are you going to shoot?"
That, my friends, is an excellent question. It's the biggest question on my plate right now.
I've been doing a considerable amount of research an thinking in regards to "how to make it in the photo business". Check out the post I did about the whole Craigslist thing, for example.
Many professional photographers out there have been kind enough to post blogs, podcasts, and videos about "how to make it", and, for the most part, it seems that the recipe for success is pretty simple:
Find something that you can do really well.
Put together a portfolio showcasing that thing that you do.
Hustle your ass off getting gigs doing that thing.
Under-promise and over-deliver (manage expectations).
Show up on time.
Profit. (heh)
One of the advantages I've got going for me is the fact that I've already developed the last bunch of those ingredients. Working as an IT guy supporting creative professionals has taught me a lot about how to work with people and make sure everyone's on the same page. From what it sounds like, this is the stuff that seems to separate successful photographers from not-so-successful ones.
What I have to do now is sort out the first two items.
I know that having a good-looking portfolio is the first step in getting work. Having it easily accessible online is key. My problem is that I don't really have what I'd consider that strong of a portfolio yet. Or a decent-looking website to present it.
So the plan right now is to pick a few basic photography categories - I've narrowed it down to "Product & Still Life", "Portraits", "Artists" and "Time Lapse" - and build as good a selection as I can, showing off my stuff.
Once I have the online portfolio put together, I'll pick out a few shots and put together a postcard-sized printed mini portfolio, which I'll carry around with me wherever I go, to make with the hustling. I've found that having an iPhone is also handy for showing off my stuff to random people I meet.
In addition to putting together my online persona/brand, I'm also hopping at any and every opportunity that presents itself to work with friends, family, friends-of-friends, etc. I'll shoot anything, at this point, save for maybe weddings and Bar Mitzvahs.
I'm also on the lookout for particularly beneficial internships or assistant gigs - I figure it can't hurt to spend time working with someone who's already made it.
With some luck, within a few months, I'll be a little closer to getting there myself.
A little background...
It occurred to me that some of you might not know much about me, so I decided to write a little bit about myself for the n00bs.
I was born in Manhattan in 1974, and shortly thereafter, my parents relocated to the lovely suburbs in New Jersey. We ended up in a small town called Wyckoff, where I went through the same public school system K through 12.
Some notable points of interest during that time included:
First camera (Nikon FM2), first computer (PC's Limited 286 6/8Mhz (see also Dell)), first drumset (Yamaha).
I also had a few interesting jobs. During the school year, I landed a gig as an assistant/gaffer to the guy that shot my sister's Bat Mitzvah pictures, who, at least according to his website, is still in the business. I would work a wedding or Bar/Bat Mitzvah every other weekend or so, sometimes as often as two or three in a row. Looking back now, it was pretty a invaluable experience, although it has definitely soured me a bit on big fancy events.
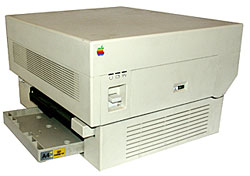
Once I had figured out that "art" was the direction I wanted to go with my life, I was fortunate enough (through connections from my father) to land a summer internship at BBDO - one of the larger ad agencies in the US at the time - as a 16 year-old junior in high school. This was in 1990, right around the boom of "desktop publishing". At the time, Apple Computer happened to be a client of BBDO. As I understood it, Apple was very interested in BBDO being on the cutting edge of technology, and made a point to keep several of their top-end products (Macintosh II's primarily, with OneScanners and LaserWriters) in good supply on any willing art director's desk, fully loaded with all of the latest versions of the cutting edge software of the day - Adobe Photoshop (2.0), Illustrator (3.0), and QuarkXPress (3.0). They also had some fantastic color printers and photocopiers, like the Tektronix Phaser, and the Canon CLC 500 (that projector-looking thing let you copy slides/negatives - badass).
When things were slow, I would keep myself busy playing with one of the public computers sitting in an empty cubicle. This was my first exposure to Macintoshes (and cubicles, for that matter), and I totally got it. By the end of my first summer there (I did it again, the following year), I was showing the art directors (and anyone one else who was interested) how to use the scanner, or plot some type along a spiral in Illustrator. It was loads of fun, and at an extremely early age, I was exposed to the world of "big advertising".
It seemed obvious that Art School was the way to go for me, and I applied and was accepted to The School of the Art Institute of Chicago.
Since I wanted to be a graphic designer, I enrolled in the Visual Communications program. At the time (1992), the computer revolution hadn't really taken a firm hold on the entire school yet (this is pre-internet, mind you), and the only Macs that were available were in one small computer lab, and in the Art & Technology department. Other departments had one or two machines for students to share on, but once I set foot onto the Art & Tech floor, I knew that this was where I wanted to be spending my time.
I was still taking pictures at this point, but it didn't take long before I was seduced by the wonders of "multimedia", and "3-D graphics", and the instant gratification of video. My trusty FM2 spent most of my college career in its bag, unused.
Fast forward to around 2001. I had made the transition from Artist to Technology Professional, and was really hitting my stride. I loved the fact that I could relate to creative professionals and speak their language, and help them do their work better, smarter and faster, using the cool technology tricks I had come to know and love. I was still paying attention to the camera scene, but it was more as a bystander than a user. I remember when Nikon first announced the D1 (with a firewire 400 port!), and knew in the back of my head that some day, I'd get back into photography with something like one of those. But not at an entry price of over $5000. Besides, I was at the height of my career as a gigging musician in Chicago, and didn't have time for that stuff.
One day, while visiting one of my regular clients, I was introduced to the Nikon CoolPix 900 camera. What blew me away was the fact that - when good light was used - the images that this little 3 megapixel camera produced looked really, really good. So I started paying attention to the other options that were out there as far as digital cameras were concerned. About a year after its release, I bought myself a CoolPix 5000 for about $500. This is where things changed for me. I was seeing things photographically again. It felt great. The groundbreaking aspect of the little CoolPix was its form factor - the fact that it had an articulated flip-around LCD viewfinder gave me a whole new way of seeing things. I could compose and shoot without my head stuck to the camera. For the following year and change, I would shoot at least a picture a day, posting them to my .mac picture gallery for friends and family to see. Holy shit, it's still up!
Moving forward, I continued to maintain an interest in photography as a hobby, shooting friends' gigs here and there, and just having fun with it.
For my 30th birthday, my folks got me a Nikon D70. The first affordable, high-quality "prosumer" DSLR that Nikon released since the D100 a few years earlier. Things got a little more serious for me then, but I was still very much in "hobbyist" territory.
It wasn't until after I had moved to New York City in 2006, working the night shift at the then-new Apple Store on Fifth Avenue, that I had heard about David Hobby's now-famous Strobist blog. I realized that I was missing out on an entirely different world of photography - lighting. I'd always known about it, but never considered that it was something that I could actually do. After all, I turned my back on photography when I was in school, and didn't really know the first thing about how to light stuff. But slowly but surely, one purchase after the next, I had put together a nice little kit of old Nikon Speedlites and modifiers, and next thing I knew, I was actually "doing it".
About a year into it, I started to realize that I really enjoyed setting up shots, and trying to make them happen. I would jump at any opportunity to make a portrait, shoot a friend's gig, sell something on ebay... I was definitely hooked.
Which brings us to the present. Thanks to this lovely economic climate, I was laid off from my full time job as an IT professional, and decided that it was time for a change of pace. I'm kinda burnt out on helping people with their computers. I still love helping people, and I've been doing lots of little IT "odd jobs" to make ends meet, but a couple of months ago, I decided that it was time for me to try returning to my creative roots, and see if I can actually do this.
In the spirit of giving back to the community that's been so inspiring to me, I've decided to start sharing my thoughts and experiences as I attempt to make it as a Professional Photographer.
Thanks for reading.
-dg
I was born in Manhattan in 1974, and shortly thereafter, my parents relocated to the lovely suburbs in New Jersey. We ended up in a small town called Wyckoff, where I went through the same public school system K through 12.
Some notable points of interest during that time included:
First camera (Nikon FM2), first computer (PC's Limited 286 6/8Mhz (see also Dell)), first drumset (Yamaha).
I also had a few interesting jobs. During the school year, I landed a gig as an assistant/gaffer to the guy that shot my sister's Bat Mitzvah pictures, who, at least according to his website, is still in the business. I would work a wedding or Bar/Bat Mitzvah every other weekend or so, sometimes as often as two or three in a row. Looking back now, it was pretty a invaluable experience, although it has definitely soured me a bit on big fancy events.
Once I had figured out that "art" was the direction I wanted to go with my life, I was fortunate enough (through connections from my father) to land a summer internship at BBDO - one of the larger ad agencies in the US at the time - as a 16 year-old junior in high school. This was in 1990, right around the boom of "desktop publishing". At the time, Apple Computer happened to be a client of BBDO. As I understood it, Apple was very interested in BBDO being on the cutting edge of technology, and made a point to keep several of their top-end products (Macintosh II's primarily, with OneScanners and LaserWriters) in good supply on any willing art director's desk, fully loaded with all of the latest versions of the cutting edge software of the day - Adobe Photoshop (2.0), Illustrator (3.0), and QuarkXPress (3.0). They also had some fantastic color printers and photocopiers, like the Tektronix Phaser, and the Canon CLC 500 (that projector-looking thing let you copy slides/negatives - badass).
When things were slow, I would keep myself busy playing with one of the public computers sitting in an empty cubicle. This was my first exposure to Macintoshes (and cubicles, for that matter), and I totally got it. By the end of my first summer there (I did it again, the following year), I was showing the art directors (and anyone one else who was interested) how to use the scanner, or plot some type along a spiral in Illustrator. It was loads of fun, and at an extremely early age, I was exposed to the world of "big advertising".
It seemed obvious that Art School was the way to go for me, and I applied and was accepted to The School of the Art Institute of Chicago.
Since I wanted to be a graphic designer, I enrolled in the Visual Communications program. At the time (1992), the computer revolution hadn't really taken a firm hold on the entire school yet (this is pre-internet, mind you), and the only Macs that were available were in one small computer lab, and in the Art & Technology department. Other departments had one or two machines for students to share on, but once I set foot onto the Art & Tech floor, I knew that this was where I wanted to be spending my time.
I was still taking pictures at this point, but it didn't take long before I was seduced by the wonders of "multimedia", and "3-D graphics", and the instant gratification of video. My trusty FM2 spent most of my college career in its bag, unused.
Fast forward to around 2001. I had made the transition from Artist to Technology Professional, and was really hitting my stride. I loved the fact that I could relate to creative professionals and speak their language, and help them do their work better, smarter and faster, using the cool technology tricks I had come to know and love. I was still paying attention to the camera scene, but it was more as a bystander than a user. I remember when Nikon first announced the D1 (with a firewire 400 port!), and knew in the back of my head that some day, I'd get back into photography with something like one of those. But not at an entry price of over $5000. Besides, I was at the height of my career as a gigging musician in Chicago, and didn't have time for that stuff.
One day, while visiting one of my regular clients, I was introduced to the Nikon CoolPix 900 camera. What blew me away was the fact that - when good light was used - the images that this little 3 megapixel camera produced looked really, really good. So I started paying attention to the other options that were out there as far as digital cameras were concerned. About a year after its release, I bought myself a CoolPix 5000 for about $500. This is where things changed for me. I was seeing things photographically again. It felt great. The groundbreaking aspect of the little CoolPix was its form factor - the fact that it had an articulated flip-around LCD viewfinder gave me a whole new way of seeing things. I could compose and shoot without my head stuck to the camera. For the following year and change, I would shoot at least a picture a day, posting them to my .mac picture gallery for friends and family to see. Holy shit, it's still up!
Moving forward, I continued to maintain an interest in photography as a hobby, shooting friends' gigs here and there, and just having fun with it.
For my 30th birthday, my folks got me a Nikon D70. The first affordable, high-quality "prosumer" DSLR that Nikon released since the D100 a few years earlier. Things got a little more serious for me then, but I was still very much in "hobbyist" territory.
It wasn't until after I had moved to New York City in 2006, working the night shift at the then-new Apple Store on Fifth Avenue, that I had heard about David Hobby's now-famous Strobist blog. I realized that I was missing out on an entirely different world of photography - lighting. I'd always known about it, but never considered that it was something that I could actually do. After all, I turned my back on photography when I was in school, and didn't really know the first thing about how to light stuff. But slowly but surely, one purchase after the next, I had put together a nice little kit of old Nikon Speedlites and modifiers, and next thing I knew, I was actually "doing it".
About a year into it, I started to realize that I really enjoyed setting up shots, and trying to make them happen. I would jump at any opportunity to make a portrait, shoot a friend's gig, sell something on ebay... I was definitely hooked.
Which brings us to the present. Thanks to this lovely economic climate, I was laid off from my full time job as an IT professional, and decided that it was time for a change of pace. I'm kinda burnt out on helping people with their computers. I still love helping people, and I've been doing lots of little IT "odd jobs" to make ends meet, but a couple of months ago, I decided that it was time for me to try returning to my creative roots, and see if I can actually do this.
In the spirit of giving back to the community that's been so inspiring to me, I've decided to start sharing my thoughts and experiences as I attempt to make it as a Professional Photographer.
Thanks for reading.
-dg
Saturday, April 4, 2009
Storage and organization
I have always been a sucker for a good bag. Over the years, I've probably had dozens of different camera bags, laptop bags, backpacks, messenger bags, man-purses, and even luggage. And don't even get me started on gig bags for my drums..
Since I've been spending a lot more time at home, I've begun to realize that I haven't been maximizing the potential of my space and equipment. In the spirit of spring cleaning, I decided to spend some time reorganizing and rearranging my storage facilities.
I've been collecting photo gear on and off since I was back in high school, and things got a bit more aggressive once I dove into the world of digital photography back in 2001. Once I got my first DSLR in 04, things picked up a bit, and for the past two years or so, since I started learning how to light (thanks, Mister Hobby!), the gear acquisition curve has definitely gone way up.
Since I haven't chosen a specific area of photography to specialize in (and honestly, I'm not sure if I ever truly will), nearly every time I leave the house with my camera, my "pack" is always a little different. When I say "pack" like that, it's short for "pack job" - the specific selection of equipment I've picked out for that particular outing.
I've read articles, listened to podcasts, and spoken to all sorts of people about different philosophies on "what to bring". In my opinion, there is no answer; it boils down to "whatever works best for you is the answer". My thinking is that as long as I keep experimenting, some sort of pattern or routine will probably settle in, and that'll be the way I do it normally. But for now, I'm still experimenting.
Here's how I'm handling things currently:
I've got one large camera case - a Pelican 1510, with dividers, specifically - which holds a _ton_ of gear. I treat this case as my home base for all of my lenses, cameras, and speedlites. They don't all fit in there at the same time, unfortunately, but the overflow fits easily into any of my other bags. But the general idea is for everything to have its own home when not in use. This way, I'll know where to find it when I need it (duh).
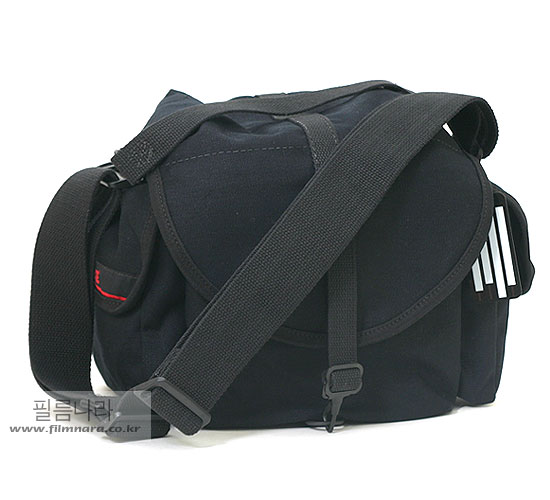
From there, I've got my camera bags/cases - all empty. I haven't gotten everything just the way I like it yet, but my idea is to have three basic bags - small, medium, and large. Right now, my small bag is the very same Domke F-3 bag that I used back in high school and college. It's made out of canvas, so it's super-light (but doesn't offer much in the way of actual protection), and I can pack the hell out if it.
I don't have a good medium-sized bag just now, but I should be able to "borrow" my dad's old Domke F-2, as he no longer uses it. My concern with this bag is that since it's got so much space, I'll be able to put 30+ pounds of crap in it, and as an over-the-shoulder "walking around" bag, that's not a great solution. I'm thinking it'd be good for short trips in town where I won't be on my feet lugging gear all day long.
For those kinds of situations - say, when traveling out of town, for instance - my current tactic has been to use either the Pelican case, which has wheels and a handle, or to use my bigass Kelty backpack (which is the largest non-frame-based pack I was able to find), stuffed with an old Crumpler Bucket (not that specific one, but very similar), and either the small Domke on top of it, or various pouches and smaller bags, full of different bits of gear.
The only bag I think I'm missing is a medium-sized backpack. Something I can feel comfortable with on a bike or walking around for long periods of time. The Kelty pack has done a reasonable job, in this duty, but sometimes it's just too damned big and bulky. So I'm still on the lookout for the right backpack.
Anyway, as a rule, I try to empty out which ever bag I just used as soon as I get home. And I mean empty - every pocket. Ideally, everything I carry around - cables, cords, adapters, batteries, caps, clips, triggers, gels, modifiers, etc - should have its own little place on my shelving unit here at home.
Maybe at some point, I'll have a standardized set of gear that I find myself using time and time again, and will just leave it all in the same case, all packed up and ready to go. But for now, I kind of enjoy the little ritual of packing and unpacking, and always going for that "perfect pack".
Since I've been spending a lot more time at home, I've begun to realize that I haven't been maximizing the potential of my space and equipment. In the spirit of spring cleaning, I decided to spend some time reorganizing and rearranging my storage facilities.
I've been collecting photo gear on and off since I was back in high school, and things got a bit more aggressive once I dove into the world of digital photography back in 2001. Once I got my first DSLR in 04, things picked up a bit, and for the past two years or so, since I started learning how to light (thanks, Mister Hobby!), the gear acquisition curve has definitely gone way up.
Since I haven't chosen a specific area of photography to specialize in (and honestly, I'm not sure if I ever truly will), nearly every time I leave the house with my camera, my "pack" is always a little different. When I say "pack" like that, it's short for "pack job" - the specific selection of equipment I've picked out for that particular outing.
I've read articles, listened to podcasts, and spoken to all sorts of people about different philosophies on "what to bring". In my opinion, there is no answer; it boils down to "whatever works best for you is the answer". My thinking is that as long as I keep experimenting, some sort of pattern or routine will probably settle in, and that'll be the way I do it normally. But for now, I'm still experimenting.
Here's how I'm handling things currently:
I've got one large camera case - a Pelican 1510, with dividers, specifically - which holds a _ton_ of gear. I treat this case as my home base for all of my lenses, cameras, and speedlites. They don't all fit in there at the same time, unfortunately, but the overflow fits easily into any of my other bags. But the general idea is for everything to have its own home when not in use. This way, I'll know where to find it when I need it (duh).
From there, I've got my camera bags/cases - all empty. I haven't gotten everything just the way I like it yet, but my idea is to have three basic bags - small, medium, and large. Right now, my small bag is the very same Domke F-3 bag that I used back in high school and college. It's made out of canvas, so it's super-light (but doesn't offer much in the way of actual protection), and I can pack the hell out if it.
I don't have a good medium-sized bag just now, but I should be able to "borrow" my dad's old Domke F-2, as he no longer uses it. My concern with this bag is that since it's got so much space, I'll be able to put 30+ pounds of crap in it, and as an over-the-shoulder "walking around" bag, that's not a great solution. I'm thinking it'd be good for short trips in town where I won't be on my feet lugging gear all day long.
For those kinds of situations - say, when traveling out of town, for instance - my current tactic has been to use either the Pelican case, which has wheels and a handle, or to use my bigass Kelty backpack (which is the largest non-frame-based pack I was able to find), stuffed with an old Crumpler Bucket (not that specific one, but very similar), and either the small Domke on top of it, or various pouches and smaller bags, full of different bits of gear.
The only bag I think I'm missing is a medium-sized backpack. Something I can feel comfortable with on a bike or walking around for long periods of time. The Kelty pack has done a reasonable job, in this duty, but sometimes it's just too damned big and bulky. So I'm still on the lookout for the right backpack.
Anyway, as a rule, I try to empty out which ever bag I just used as soon as I get home. And I mean empty - every pocket. Ideally, everything I carry around - cables, cords, adapters, batteries, caps, clips, triggers, gels, modifiers, etc - should have its own little place on my shelving unit here at home.
Maybe at some point, I'll have a standardized set of gear that I find myself using time and time again, and will just leave it all in the same case, all packed up and ready to go. But for now, I kind of enjoy the little ritual of packing and unpacking, and always going for that "perfect pack".
Wednesday, April 1, 2009
"Continuous" timelapse shooting
For some time now, I've been into making timelapse movies using several different digital cameras.
Here's a quick rundown of my timelaspse history:
My first digital camera was a Nikon CoolPix 5000. Nikon made an accessory for it called the MC-EU1, a "remote cord". It functions as a cable release, but also has a nifty little intervalometer built-in. Only downside to it is that the shortest interval available is 2 minutes. Good for long-term stuff (like, a full day), but not so much for the short stuff that I've been into lately.
Next, I got a CoolPix 5400, which, for all intents and purposes, was the same camera as the 5000. It used the same remote cord, and the same power adapter (another necessity for the long-term shot.
Then I got my D70. Being one of the earlier Nikon DSLRs, it didn't have the handy-dandy "accessory" port that its successors did, so there was no way to trip the shutter remotely, save for the dinky little infrared remote, which is very finicky about line-of-sight. And easy to lose (I lost my first one).
This is when I started thinking about using Lego to me out. I went through various phases of experimentation, using motors, variable speed controllers from the European train sets, and elaborate gear ratios, in order to both physically trip the shutter (with a little mechanical "finger"), and even animate the camera - having it roll across my windowsill, for example.
Finally, I wound up getting a Canon SD630. The thing that really makes this a great camera for timelapse work is something called the CHDK - the Canon Hacker's Development Kit. Using this alternative firmware, I can utilize a really nice and simple intervalometer program (a script, technically), and set intervals as low as 3 or 4 seconds (basically as long as it takes for
the camera to focus, expose, and record the image).
The bulk of my recent timelapse work has been done with this camera/software combo.
Which brings us to the topic of this post.
Recently, I came across a video on Vimeo that was shot with - get this - the very same camera I've got (the 630), but using a totally different technique than anything I'd tried in the past. (I can't seem to find it right now, otherwise I'd link to it)
Anyway, in the comments of the video's post, the creator mentions that he used the camera's "Continuous" mode to shoot rapid-fire frames, by _manually_ holding down the shutter button for minutes at a time.
As soon as I'd read this, I busted out my camera and experimented a bit, and found that at the resolution I tend to shoot at (about 1600x1200 or so), the camera grabs about 1-2 frames per second. I filed this info away, and sort of forgot about it.
A few weeks later, I came across a good deal on a pair of small ratcheting bar clamps, and figured that they might be the perfect way to hold down the shutter button on my camera for longer periods of time. It turns out that I was right.
The other day, I ventured up to my roof, and set my camera up like this:

I figured I'd let it go for as long as it could take it - either the battery would die, the card would fill up, or the camera would just freak out and crash. Guess what happened.
Nope, the card filled up.
I was kinda sad, because I really loved the way the clouds were moving, and wanted to get a few more minutes of motion in, but I was really psyched that it actually worked. Now, the only problem I have is that the camera doesn't seem to like SD cards larger than 2GB, and the only 2GB card I have is my Eye-Fi card. The problem with the Eye-Fi card is that it consumes more battery power than a regular SD card, and - assuming this is because it's trying to broadcast the images it's capturing as it's capturing them - it seems to inhibit the write speed of the images to the card, which yields a lower (slower) frame rate.
Oh, here's the result of the test:

I think this combination of frame rate and cloud motion worked especially well.
So. Stay tuned for more "Continuous" mode timelapse stuff in the future.
Here's a quick rundown of my timelaspse history:
My first digital camera was a Nikon CoolPix 5000. Nikon made an accessory for it called the MC-EU1, a "remote cord". It functions as a cable release, but also has a nifty little intervalometer built-in. Only downside to it is that the shortest interval available is 2 minutes. Good for long-term stuff (like, a full day), but not so much for the short stuff that I've been into lately.
Next, I got a CoolPix 5400, which, for all intents and purposes, was the same camera as the 5000. It used the same remote cord, and the same power adapter (another necessity for the long-term shot.
Then I got my D70. Being one of the earlier Nikon DSLRs, it didn't have the handy-dandy "accessory" port that its successors did, so there was no way to trip the shutter remotely, save for the dinky little infrared remote, which is very finicky about line-of-sight. And easy to lose (I lost my first one).
This is when I started thinking about using Lego to me out. I went through various phases of experimentation, using motors, variable speed controllers from the European train sets, and elaborate gear ratios, in order to both physically trip the shutter (with a little mechanical "finger"), and even animate the camera - having it roll across my windowsill, for example.
Finally, I wound up getting a Canon SD630. The thing that really makes this a great camera for timelapse work is something called the CHDK - the Canon Hacker's Development Kit. Using this alternative firmware, I can utilize a really nice and simple intervalometer program (a script, technically), and set intervals as low as 3 or 4 seconds (basically as long as it takes for
the camera to focus, expose, and record the image).
The bulk of my recent timelapse work has been done with this camera/software combo.
Which brings us to the topic of this post.
Recently, I came across a video on Vimeo that was shot with - get this - the very same camera I've got (the 630), but using a totally different technique than anything I'd tried in the past. (I can't seem to find it right now, otherwise I'd link to it)
Anyway, in the comments of the video's post, the creator mentions that he used the camera's "Continuous" mode to shoot rapid-fire frames, by _manually_ holding down the shutter button for minutes at a time.
As soon as I'd read this, I busted out my camera and experimented a bit, and found that at the resolution I tend to shoot at (about 1600x1200 or so), the camera grabs about 1-2 frames per second. I filed this info away, and sort of forgot about it.
A few weeks later, I came across a good deal on a pair of small ratcheting bar clamps, and figured that they might be the perfect way to hold down the shutter button on my camera for longer periods of time. It turns out that I was right.
The other day, I ventured up to my roof, and set my camera up like this:
I figured I'd let it go for as long as it could take it - either the battery would die, the card would fill up, or the camera would just freak out and crash. Guess what happened.
Nope, the card filled up.
I was kinda sad, because I really loved the way the clouds were moving, and wanted to get a few more minutes of motion in, but I was really psyched that it actually worked. Now, the only problem I have is that the camera doesn't seem to like SD cards larger than 2GB, and the only 2GB card I have is my Eye-Fi card. The problem with the Eye-Fi card is that it consumes more battery power than a regular SD card, and - assuming this is because it's trying to broadcast the images it's capturing as it's capturing them - it seems to inhibit the write speed of the images to the card, which yields a lower (slower) frame rate.
Oh, here's the result of the test:
I think this combination of frame rate and cloud motion worked especially well.
So. Stay tuned for more "Continuous" mode timelapse stuff in the future.
Subscribe to:
Comments (Atom)
