Thursday, May 28, 2009

Pimps & Pinups shots are online!

A while back, I was asked by my friends at Pimps & Pinups (a hair salon) if I could help them out with a couple of photographs for their website.
At long last, they're now online!

To get to them, go here, and click on "New York". That's the first one. To get to the second one, click on "Services".

Retouching/post production by Seth Thompson.

Here are bigger versions:

PnPsip-1


PnPspurt-2


Some background:
Pimps & Pinups is a hair salon that was started a few years ago in London. This past year, they decided to open up a second location here in New York City.
My good friend, Michelle Williams was hired as a stylist there, and not long afterwards, she asked me if I'd be interested in helping out with some photographs of the salon for the website. I happily obliged (this was before I decided to make the big transition, and was working full-time as an IT consultant), and put together these shots. The owners of the salon were impressed, and put them up on the website immediately. They then asked me if I would be interested in another photo...

If you reload the P&P website, and hit the "London" link this time, you'll see the original version of the shot I made. They asked me if I could essentially reproduce this look and feel, but with a different girl, in the New York salon. I knew that it would be a challenge, but I was eager to give it a shot. After setting the appropriate expectations, I put everything together - rented some nice studio strobes, lined up an assistant, and made plans with my friend Seth - who is a bit more skilled in Photoshop than I - to help out with the post processing (of which I knew there would be a lot).

The main direction was to make my shot look as similar to the original as possible. Looking back, there are a few things that I would do differently today, but all things considered, I think everything worked out pretty well.

Wednesday, May 27, 2009

Working for free.

Today, two opportunities came up for me to do some work. The first one was for a fund raising event; as I understand it, they were looking for someone to do basic coverage, and maybe shoot some pictures of key people involved. We didn't really talk about the details because they were looking for someone to do the job for free.

The second job was to shoot some pictures of a band for a magazine - my friends in Loop 243 are being interviewed, and the editor wanted some photos to go with the article. Unfortunately, there was "no photo budget".

In both of these cases, I found myself thinking about the various discussions that went around the photography scene blogs a few months ago on the topic.

And in both of these cases, I turned down the job. Well, kinda.

For the fund raiser, it was a pretty simple choice. I didn't have any details, and after some further explanation from the friend of mine that referred me in the first place, it became clear that this wasn't going to be a worthwhile opportunity. This friend is also a working professional, and didn't realize the nature of the inquiry until after he had asked me about the job, so there aren't any hard feelings, and hopefully he will continue to keep me in mind for work in the future.

The music magazine job was a bit tougher to decide on, but ultimately, we worked out a reasonable compromise. A few months ago, I shot some promotional photos for Loop 243. They paid me for this work, and everything is all good with them. As far as I'm concerned, they own those photos, and can do with them whatever they see fit.
So, rather than taking on the assignment, I proposed that they choose from the existing work, and I would provide them with whatever support they might need. I'd still get the same photo credit I would had I taken the assignment, and my professional principles remain intact.

I was very straightforward with both the band (who recommended me to the magazine in the first place) and to the music editor about the situation, and everyone was very understanding - we're all good, now.

My hope is that the next time the magazine needs a photographer in New York City, they'll think of me - not just based on my photographic skills, but also based on my professionalism and demeanor. Which, I'm learning, can actually be as important (if not _more_ important) than one's ability to take a picture.

Saturday, May 23, 2009

film!

For quite some time, I've been wanting to get back into film.

My ideal setup would include a nice medium-format camera, which I would use as an alternative to my DSLR for "final", higher-end work. Work out the particulars of the exposure and composition with the DSLR, and then transfer the exposure info to the film camera, and fire a few more frames.

I have every intention of doing this some day, but my budget doesn't really allow for this system - yet.
In the meantime, I've been satisfying my film cravings by using my dad's old SLRs. I currently have his old F3, and have my eyes on his F4 next.

Not long ago, I was in a local grocery store, and while I was on the checkout line, I spotted a row of these little cameras hanging right next to the magazines and the gum:

disposable cam1


See that price tag? That's right. $2.99. I figured "at that price, why the hell not?". So I bought one, and after opening it up when I got home, I found that it was obviously a re-packaged disposable camera. Here's what it looked like after I took off the cheesy paper wrapping:

disposable cam2


So I carried that little guy around for a week or so, just shooting random things, half-expecting that none of it would come out.
To my surprise, everything worked out. You can browse some of the fruits of this little guy here.

Satisfied with these results, I decided to kick things up a notch, and purchased myself a Holga. I'm relatively inexperienced with medium-format film, so I figured this would be a nice intro to the medium (har har).

Getting the 35mm film processed and scanned (with no prints) from Walgreens or Duane Reade costs about $5. They're obviously not the highest-quality scans, but they're fine for sharing and "seeing what you got". I figure somewhere down the line, I'll pick up a film scanner for myself, and be able to do full-rez scanning if/when I ever need to.

Getting the Holga film processed (but not scanned) also goes for about $5, which isn't bad. I still need to look into the most convenient and cost-effective way to handle this, as I know there are a lot of folks out there doing this already. If anyone has any suggestions, please feel free to share.

Anyway, I decided to keep this trend going for a while, so for the time being, I should have at least one film camera on me at all times. Keep an eye on this set for my progress.

Friday, May 22, 2009

Light Reinforcement

As some of you might know, photographing musicians performing on stage at a typical venue can be a bit of a challenge.
Most of the time, the lights that are there are either not terribly bright and/or poorly positioned. Most clubs don't really put any energy or effort into actually lighting the stage, and I can't say that I blame them - it's extra work for someone who's probably not getting paid much (if at all), and since each set is only going to be 30-60 minutes, what's the point?

I've been experimenting a bit with shooting shows a bit lately, and decided to share some of my experiences and ideas.

When I first started shooting shows, I decided to only use available light. Pictures shot with flash tended to look all washed out and unflattering, and bright flashes might also run the risk of distracting the performers on stage.

The more recent digital cameras have really great low-light performance, and can shoot at ISOs like 1600 and even 3200 with much better results than their predecessors. Even still - the higher your ISO, the noisier your image, and the less sharp it will look. Not to mention that your camera's going to be shooting wide open, and at a shutter speed that would either require a steady hand, a monopod, or some good image stabilization. And even then - shooting at those slow speeds is still going to result in blurred images, because performers tend to move around a lot on stage.
Sometimes, that's a cool effect, but I thought it'd be nice to get some sharpness, if at all possible.

So I got to thinking - "wouldn't it be great if I could shoot at ISO 400 at like, an f8?"
And I came up with an idea - "light reinforcement".

This is a variation on a term used in the world of live audio, called "sound reinforcement".
The basic concept of sound reinforcement is to take whatever sound is already there, and to, well, reinforce it. Beef it up. The best examples of true sound reinforcement (to me, anyway) are theatrical performances - plays and musicals. These are traditionally performed in a proper theatre, which has been designed and engineered for sound to project off the stage. However, since there are often a variety of elements coming off the stage - different actors/singers, musicians, sound effects - getting everything balanced can be a bit tricky. The way this is typically handled is to put a microphone in front of anything and everything that is making a sound, and sending all of those signals up to the sound guy, sitting at the back of the theatre. From there, he makes whatever adjustments are necessary to keep everything sounding naturally balanced, as if it were coming right off the stage - which, for the most part, it is. But having that little extra bit of support from a microphone and some speakers can make all the difference in the world.

My thought was to essentially use this same principle, but with light - augment the existing lighting with a little bit of my own.
Using a speedlite equipped with a Pocket Wizard, mounted on a super clamp with a ball head (or a magic arm), with a gel or two and either a snoot or a grid (or both), I could effectively mimic what a real stage light would look like. Using colored gels is way more forgiving with music photography, because stage lighting is always colored anyway.
The ideal setup would be to have my strobes positioned right next to where the house lights were already, either clamped to the same bar/grid as the house lights themselves, or very nearby. This would help minimize any "blinding" effects that might occur to the talent on stage, and also maintain the authenticity of the look. With one light on each side of the stage, I was able to get a nice, dramatic cross-lighting effect, giving me a good 2 or more stops of light to augment the existing stage lighting. Keeping the strobes at lower power (1/16 or 1/8) is just enough to make a difference, but not enough to be noticeable to the performers (your milage may vary on this, actually, depending on the size of the venue), and it also ensures faster recycle times and more pops per show.

At the last show I shot, I asked the performers if they noticed me and my strobes, and they said "huh? you were using a flash? I had no idea".
I've tried this technique a few times now, and am confident in the approach.

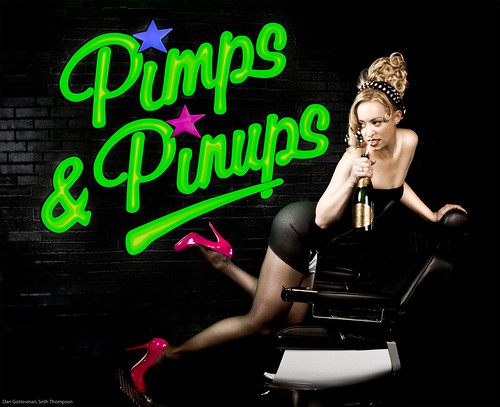
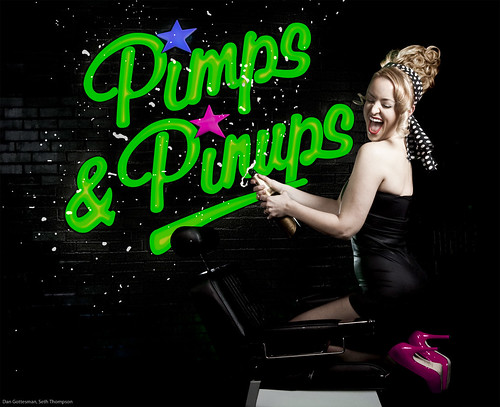
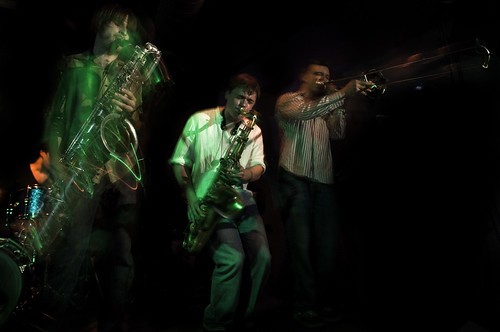
Here are a few shots of the technique in use:

HappyChris


Horns


(these have both been post-processed in Photoshop)


Next time I put this setup together, I'll snap some setup shots and post them here.

Thursday, May 21, 2009

Upgrading a LaCie Biggest FW RAID

A couple of years ago, I happened upon a decent deal on a LaCie "Biggest FW800" RAID. It was a 1TB model, with four 250GB SATA drives in it.
I won't get into the particulars about how the unit works or what its features are, but I will say that it has performed quite admirably for me, with no issues.

A few weeks ago, I inadvertently deleted a huge folder full of movies and television shows that I'd been holding onto just for convenience (I will sometimes put together "care packages" for friends with random or specific stuff on a few DVDs, and it's nice to have my favorites handy).

Since I knew I'd be able to re-download most of the stuff I'd lost, I got to thinking - "this thing is pretty much completely empty right now..." - and I decided that it was time to upgrade.

The four 250GB drives, when configured as a RAID-5, yielded about 680GB of useable storage. I figured replacing them with 1TB drives should net me about 2.8TB or so, in the same configuration. So I found myself a nice deal on a set of 1TB hard drives, and when they arrived, I installed them in the unit.

Here's where things got interesting...

When the unit began formatting/initializing the drives into the array, the LCD panel was reporting that the volume size was XXXX. Normally, this would report an actual number. Since the volume wasn't visible to the OS at this point, all I could do was cycle through the status reports of the individual drive modules on the LCD of the RAID. It recognized them all as 1TB drives.

After a couple of hours, the initialization finished, and the volume showed up on my machine - as a 2TB volume. Not 1.9, not 2.1, and sadly, not 2.8... But an even 2 terabytes.

My conclusion is this: these particular RAIDs simply cannot recognize drives larger than 500GB. This makes sense, because at the time of the unit's manufacture and for the [relatively short] time period that they were sold, the largest drives available were 500GB. Looking back at the literature, I found that this model was available in 1TB or 2TB configurations. It also looks like this model was only around for about a year or so, replaced by a similarly named (why do they do that?), similarly featured product.

I'm not that upset by my "loss" of space. After all, I more than doubled the amount I had in the first place. And I don't feel bad about the drives, either, as they will most likely find their way into a Drobo Pro one of these days.

Anyway, I just wanted to share my experience on the off chance that anyone else out there might have one of these units, and was considering the same upgrade plan I had. You can save a little money and go with 500GB drives, as that's as big as it'll use. Although, I'll bet that the formatted capacity of a 4x 500GB RAID would be closer to 1.8TB, so maybe 750GB drives would be the best. [shrug]